Cumulatively, there is a list of 25 throws that I have compiled from the various US military field training manuals from the WWI era to present. A substantial amount of those throws being variations of only 4 basic throwing techniques. These 4 techniques served as the core or primary techniques in military combatives programs. These 4 staple throws are still taught in the military combatives programs to this day.
The older field training manuals from the WII era to the Vietnam era instructed obtaining proficiency with break falling and the 4 basic throws before moving on to their variations or to the advanced throws. The field manuals from the 50’s to the O’Neill influenced “69” and “71” US Army Field manuals are the most comprehensive on the subject of throwing an opponent when in combat. The following are the 4 core or primary throws in Combat Judo that are found in various military Hand to Hand combat field training manuals from the 1940’s to present:
1. Hip Throw – (Ogoshi)
2. Over the Shoulder Throw – (Seoi Nage)
3. Reverse Hip Throw – (Gyaku Ogoshi)
4. Cross Hock takedown – (Osoto gari)
The Army classifed its judo throws differently than the kodokan or today’s sport classifications. Since these four majo throws and thier many variations made up most of the 25 throws. These four basic throws also served as the four classifications of throws in combat judo.
1. Hip Throws – any and all variations of throws using the hip as fulcrum
2. Over shoulder throws – any and all variations of throws over the shoulder
3. Takedowns – any leg or foot sweeps, tackles, leg scissors takedown, head twist takedown, etc
(The 1971 US ARMY FM 21-150 would be the last time we would see the variations and how the army classified them. UNFORTUNATELY from 1983 to present the field manuals only showed the 4 basic techniques, no variations, and didnt expound beyond a basic genric application.)
The Hip Throw is not only a basic technique, it is one of the four major combat throws still seen in miliary combatives manuals to this day. There can be frequent opportunities to execute this throw in an actual fight. One can easily transition into a hip throw from various striking and grappling situations.
The military combatives variation of O-Goshi (Hip Throw) has been successful in actual fights, as well as competition and sparring. The objective of the hip throw is to break your opponent’s balance by IMPACT and quickly and forcefully throw him to the ground. The best use of the hip throw when you can move in quickly not giving the opponent any time to react.
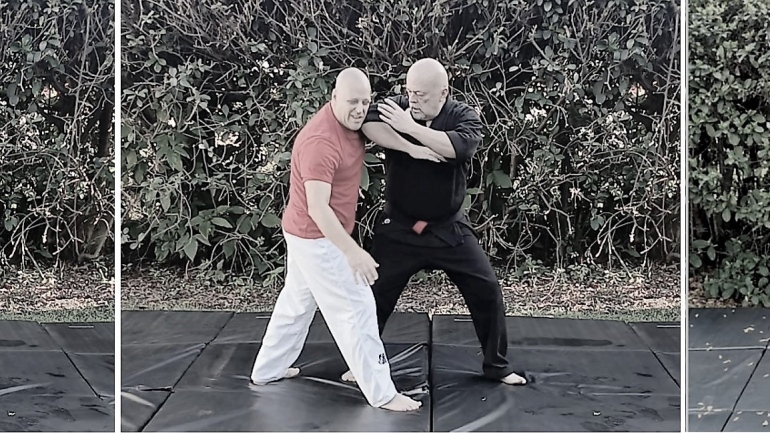
 (1) Either from a fighting stance or non-violent posture take a step forward with your right foot. At the same time STRIKE your opponent hard on his right shoulder with the heel of your left hand and grab his clothing at the area struck. The strike is delivered quickly and hard much like a rear hand straight punch/cross in boxing. This blow should be hard enough to completely disrupt your opponent’s balance and knock him back on his heels.
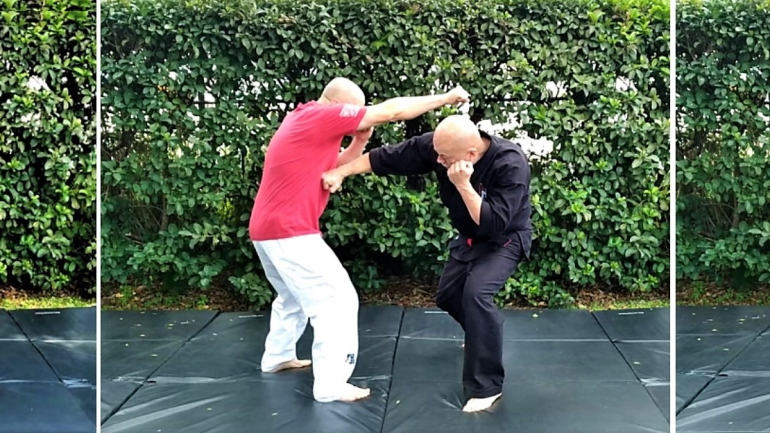
(2) Pull on your opponent’s shoulder forcefully with your left hand as you step forward with your right foot on the inside of the right foot of your opponent. Pivot on the ball of your right foot while simultaneously placing your right arm around the opponent’s waist. The back of your heel should be next to the center or the toes of your opponent’s right foot. Step back with your left foot while pivoting the heel of your left foot should end up next to opponent’s big toe on his left foot. Pull him forcefully into you as you complete your pivot. Your knees should be bent, your belt line should be below his belt line. This movement leans your opponent over your right hip below his waist and leaves him partially suspended in this position.
(3) Straighten your legs quickly thrusting your hips into your opponent. Continue the pull with the left hand at the same time bend forward while finishing the pull forward and downward with both arms driving your opponent into the ground. Use the hip as the fulcrum, throwing the opponent over your right hip and NOT over the outside of your right leg.
(To do a left hip throw substitute the word “left” for “right” and “right” for “left”.)
How to train the hip throw
When in training strive for precision and accuracy. Do each PHASE of the throw with deliberate action. Once you have thoroughly learned the throws work for speed through constant practice. Combatives of any form is a perishable skillset so train, train, train.
PHASE ONE – You should enter and disrupt simultaneously. Entry and disruption should be accomplished in one move. As specified in instructions, take a step forward with your right foot. At the same time STRIKE your opponent hard on his right shoulder with the heel of your left hand and grab his clothing at the area struck.
PHASE TWO – Left hand gives a quick jerk bringing his head back over his toes as you enter. Keeping your knees bent step toward his right foot with your right foot and arm goes around the waist Phase two ends with opponent suspended on your hip.
Your arms should not be used to pick up and or load your opponent on your hips. (This generally means: 1.) You are going in too high; your knees aren’t bent enough and your hips are not lower than your opponent’s hips. 2.) You aren’t stepping deep enough). Your opponent should be already teetering on your hip BEFORE you straighten your legs.
PHASE THREE – Finish throwing your opponent to the ground by twisting your upper torso bring your left elbow toward your left knee or hip.
Hip throw – Two on one variation from cover vs haymaker
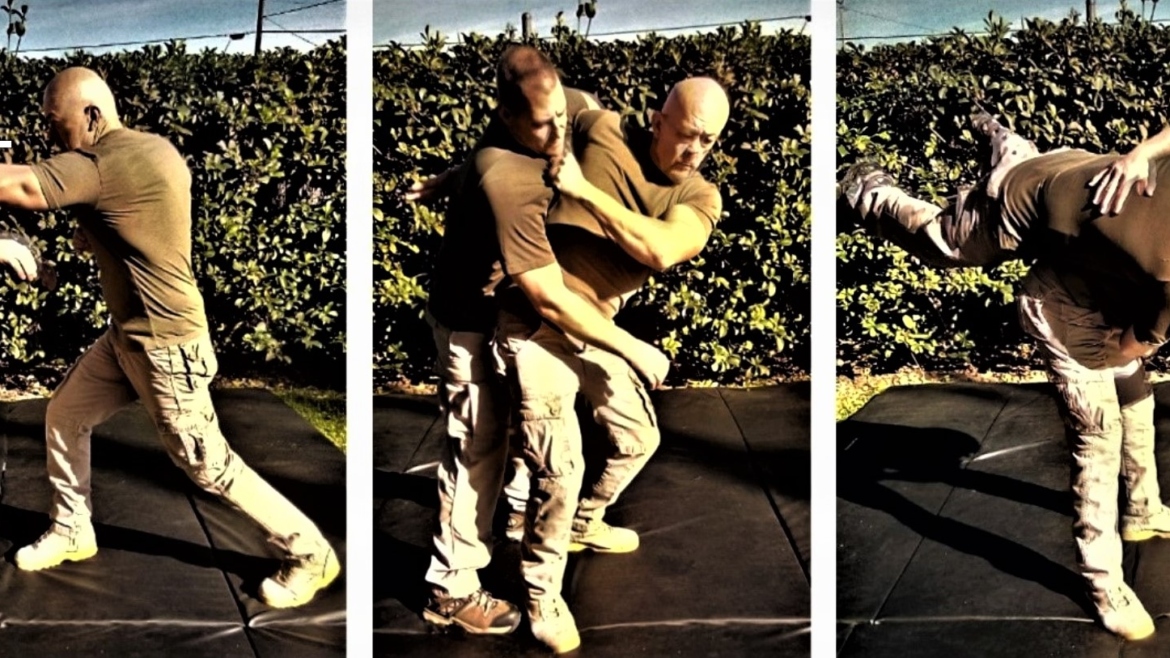
In this variation you pick up on an attack late and only have time to cover and protect your head. From the cover position you grab the opponent’s right arm with both of your hands and using an elbow strike to help set up your throw. The two on one variation of the hip throw can found in the 1963 US Army FM 21-150 on page 125.

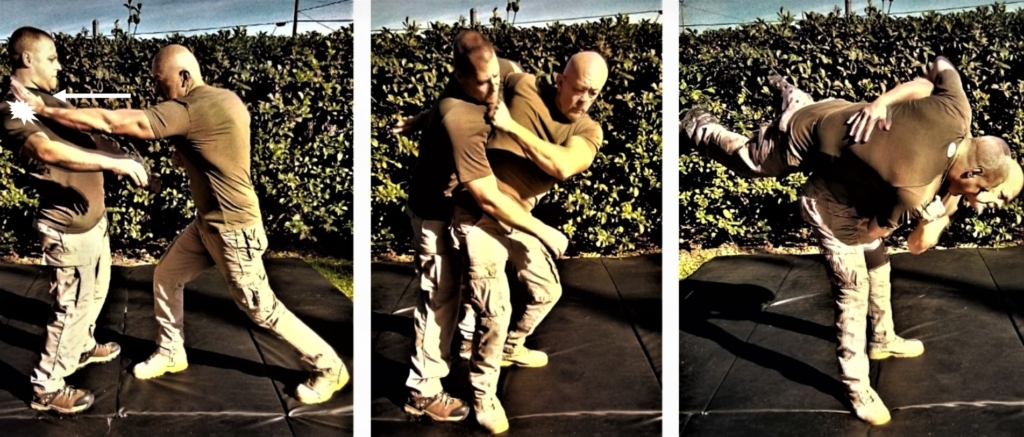
(1.) The opponent attempts a right haymaker punch. You pick up on the punch late and manage to cover your head with both arms and block his punch with both of your arms.
(2.) Grab over the top of his right arm at the triceps and just above the elbow with your left hand. Step in with right foot and pull on his right hand as you deliver a right elbow strike to the side of his ribs.
(3.) Immediately bring your right arm up under his arm and pinch his arm at the arm pit between your right forearm and bicep as you step your right foot toward his right foot. Pull on your opponent’s arm and pivot on ball of your right foot. Step back with your left foot. The heel of your left foot should end up next to the arch of his left foot. Your knees should be bent, your belt line should be below his belt line. Your hips are over to the right. Your right hip should be to the outside of your opponent’s right hip. This leans your opponent over your right hip leaves him up off his heels and on his toes partially suspended and teetering on your hip.
(4.) Straighten your legs quickly thrusting your hips into your opponent. Continue the pull with the left hand. Bend forward while finishing the pull forward and downward with both arms.
(5.) Twist your torso to the left and using the hip as the fulcrum, throw the opponent over your right hip and to the ground.
How to train
Walk through the throw, step by step, while focusing on proper body positioning and execution. When in training strive for precision and accuracy. Do each PHASE of the throw one at a time with deliberate action. Gradually work to do it in one smooth motion. Once you have thoroughly learned the throw work for speed through constant practice.
(To do a left hip throw substitute the word “left” for “right” and “right” for “left”.)